Showing posts with label Christmas. Show all posts

Monday, December 3, 2012

D.S.C.C.W.-Snowman Ornament

Hey Everybody! I am so excited to get this week started with the Christmas crafts the kids and I have been working on. I hope you enjoy them as much as we do. 
I tried to come up with different crafts by using items that either came from the Dollar Tree or were $1 or less.
Today we'll start with a Snowman ornament.
Here's what you'll need to get started:

-Wooden Round disk..found ours at the Hob for 67 cents, I believe, in the clock making section. 
-Craft paint-White, Orange, and Black(already had on hand)
-2 Spools of Ribbon (1 for "scarf" and 1 for hanging the ornament)
-Glue Gun and Glue sticks
-Scissors
-Craft Foam, red & black(had on hand as well)
-Craft glue
-Paint brush

 You will need to paint the wooden disk first with the white craft paint. Then mark out with a pencil where the eyes and smile go.
 Let your little ones use their fingers to put a black dot on each spot you marked with a pencil.
 Just small little dots
 It should look something like this:o)
Next you want to cut out a hat from the black craft foam. I folded the foam in half lengthwise, sketched out a hat, and then cut it. Just trimmed a little here and there to make it look even. You'll also want to cut out some red for the "ribbon" above the brim of the hat(see pics below), and attach it to the hat. You'll want to do this BEFORE you put the hat on the ornament. I did that part backwards and had to remove the hat while the glue was still wet.
 Squirt a little glue on the top of the Snowman head, and attach the hat.
 It should look like this when you're done. 
I painted a little carrot nose on his face. You can let your kids do this, but mine are still a little young to wield a paint brush:o)
 Next is the scarf. I used ribbon I already had. I tied a knot, and trimmed the ends on an angle. I attached it using my hot glue gun at the Snowman's chin.
 Once everything is dry, you can flip it over and attach ribbon to the back so that it can be hung.
This is what our Snowmen looked like when they were finished...so cute!

Make sure to come back tomorrow!! I'll be sharing Christmas Angels using some very interesting materials:o)

Participating here:
UndertheTableandDreaming

Monday, November 19, 2012

Dining Room Table-Christmas Centerpiece

Good Monday to you all! The elves have been busy here in our home, and are ready for their naps:o)
It looks like the North Pole exploded in our house...AND I LOVE IT!
I am not ready to share all of our trees...yes there are multiples..possibly 8...so I am waiting until after Thanksgiving to let you guys in on the fun:o)
I know the suspense is killing you;o)
I thought I would share my center piece for the dining room table, just to hold you over.
I created it using items I already had. I love FREE:o)
The September or November(can't remember which) Southern Living magazine had a beautiful centerpiece for fall with pumpkins, fall flowers, and berries. They had an enormous trough that they put it all in, and I thought, I wish I had something like that...well I completely forgot that I did:o)
I got a VERY distressed plant container from one of my mother's friends back in the summer, and stuck it in the attic so the hubs wouldn't fuss at me for junkin' up the garage. Out of sight, out of mind, so I didn't remember having it until I started digging through the attic for Christmas stuff.
I was so very very excited. And even more excited that I had the stuff to fill it up.
Fancy and Free:o)
 It makes a huge statement, because it is huge:o) My favorite part is that it is contained. I don't have a bunch of little nick-knacks strewn across the table like I normally do. Clean, elegant, and bold.
So are you ready for the holidays? Do you have all of your decorations up, or are you patient, and wait until after Thanksgiving to get in the Christmas spirit?
I must be off...I have to go make little man's vest and bow tie for the wedding. Hopefully I will be able to show it off tomorrow. Have a great Monday y'all!

Thursday, November 10, 2011

Christmas Card Holder

Here is a fun craft I did a few weeks ago. I found a large frame at a yard sale for $5. I had no idea what I was going to do with it, but it had previously been a $60 frame from Hobby Lobby, and I couldn't pass on this cheapy:o) I used Krylon's Avocado spray paint to give it a new finish..and then I drew a creative blank. It sat in the garage for several days before I came up with the idea to make it a photo display.
I went to Walmart to get the burlap webbing..it was really inexpensive..I think I paid 60 cents a yard for it.
I used a staple gun to attach the ends to the lip of the inside of the frame, and starting weaving. It was really easy. 
The original intent was just to put regular pictures on it, but when I got done, I knew that displaying Christmas cards on this beauty would be the perfect use for it .
The extra large paper clips are also a Walmart purchase. You can find them in the office supplies section.
The office was the right spot for this photo holder because it is one of the few rooms in the house that is decorated in red for Christmas. 
I have most of the decorations up in the office. There are a few final touches that I want to add before showing off the finished room. I'm on the hunt for a hounds tooth hat..an inexpensive one, that is:o)
Tomorrow the kids go for their pictures with Santa...they think that they are just having Christmas pictures taken..the photographer wanted them to be surprised, so that she could catch their reaction..I can't wait!! I am also getting our family pictures back tomorrow, so I hope to share them with you all as well! 


Participating in these parties:
Furniture Feature Fridays

Wednesday, December 1, 2010

My Home for the Holidays

I do realize that there are fewer days until Christmas now;o)
I hope that you all had a wonderful Thanksgiving. We had a fabulous time and my eye twitching has ceased for now;o) I have a special request to ask of you guys. My father-in-law broke his knuckle while playing football with all the kids. He had surgery yesterday and they had to put 2 pins in his hand. It is going to take 2 months for his hand to heal and he's a diabetic, so there is a chance for complications. Please pray for a quick and uneventful recovery for him. Thanks in advance!

I, like the rest of you have pulled out all of the Christmas decorations. This house is extremely festive. I am sharing some of the decorations in my house today. 
Here is the long awaited and anticipated tree that I purchased from Craigslist before Turkey day...I told you it was big:o) The decorations are from Dillards purchased by my mother. She had intended them to be on her tree this year, but much to her dismay and much to my pleasure, they didn't look right in her living room. I think they look FABULOUS right where they are;o) Thank you Mother!!
The skirt has fur trim...It is so pretty.

My Sheet Music Wreath. I didn't work too hard on this center piece. So many other things took priority...one being S.R. with her croup....she is on steroids, and she is wacked out right now. No sleep last night and full of herself right now:o)

 Our dining room. I plan on changing out the table decor soon. I have some Pottery Barn gift cards to spend:o) I cannot wait to go shopping there! I just need to get everyone well so that I can:o)
The kitchen table....notice anything different? Could it possibly be those sweet little chairs at the table??:o) I'll share the seat cushions tomorrow.
I found this Amaryllis plant at Target today for $7. I think this would make a great hostess gift.

Upstairs bedroom...part of it, at least:o) I finally got this room cleaned. This is usually where I do all my cutting and ironing while sewing. It's also the dumping grounds for anything I really don't know what to do with but don't want to get rid of:o) I have gone on a major cleaning spree the past few days.
Close up of my little tree from Dollar General. This tree was $5. I have lights on it, but I need an extension cord so that I can plug it in.
The bonus room. Another "gift" from my mother is the garland across the entertainment center. 
And here is the tree in the bonus room. Yesterday the kids and I made gingerbread men ornaments. They are on the tree somewhere:o)
The sad thing about all of this is that this isn't the entirety of my decorating. I still have 2 more trees that I haven't shown you. The one is E's room and the one in our bedroom. I can share those another day. I must be off to go take care of my little ones. Have a great day, and Merry Decorating!
participating in


Wednesday, November 17, 2010

Another Ornament and a Tree


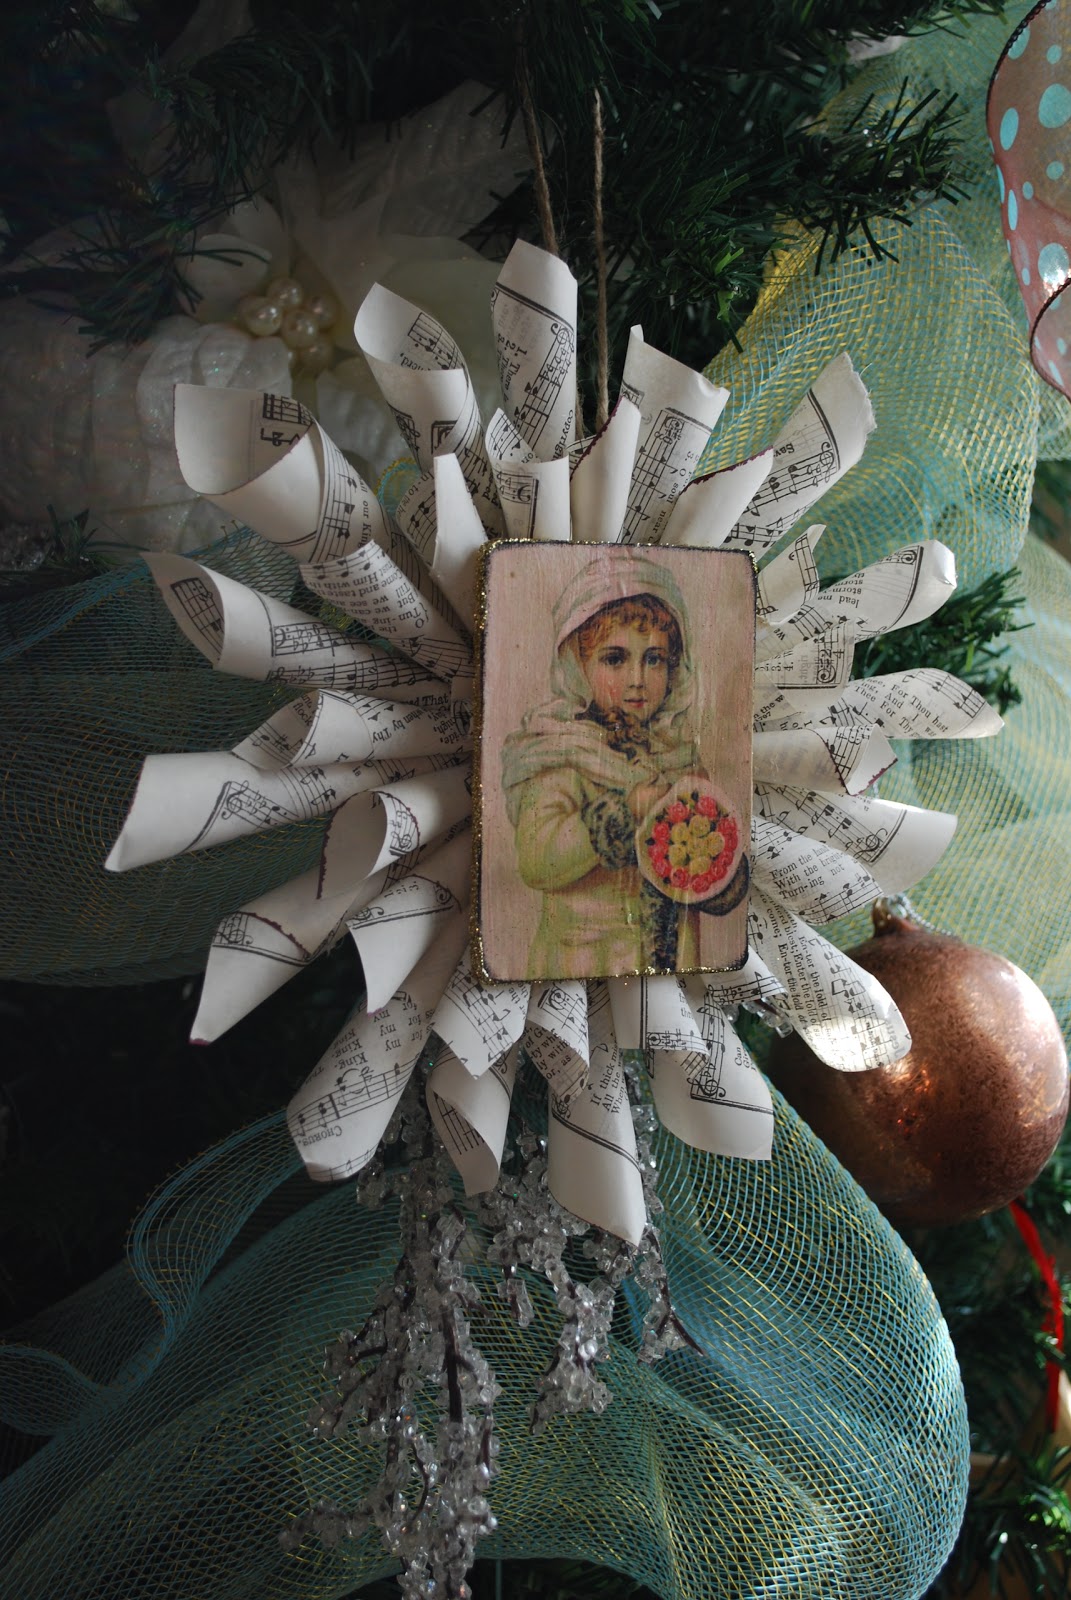
I made this ornament as a door prize for the Homemakers' Holiday Bonanza last Saturday. The Bonanza was a lot of fun. And Santa Claus gave us a little talk. 
The idea for this ornament came from Miss Mustard Seed. She is amazing in all that she creates:o)
I used the same hymnal sheet music that I used on the Sheet Music Wreath. I just cut the paper down a bit to make it ornament size. The picture of the girl in the center of the ornament is from The Graphics Fairy. If you guys haven't checked out her blog, you are really missing out. She has some great free printables!! I hated to give this ornament away b/c I thought it was so pretty...oh well...I guess that means I have to make more:o)
Here is one of the trees that I put up. This one is in S.R.'s room. Since her room is butterfly themed, her tree is loaded down with butterflies:o)
Nice and spark-ly, and EXTREMELY PINK. She loves it, I love it, even the men of the house love it:o)

I have been working on a few projects at the house...non-Christmas:o) Looking forward to sharing them with you when I get them completed. We are also making a few changes in the kitchen...nothing too drastic, but enough to make me smile:o) Have a great Wednesday everyone.

Thursday, November 11, 2010

Christmas Ornament Week-Day 3

Today I have two ornaments to share with you. The first being super easy. 
This ornament is nothing more than a feather boa wrapped around a Styrofoam ball, with a little hot glue here and there. I had one feather boa on hand and purchased one more. I got them from Hobby Lobby and if you  use your 40% off coupon, you can get them pretty cheap. I made 4, and the main reason I wanted these was to use them as filler for the tree. They are nice and fluffy and fill a lot of space.
This next ornament was great in theory, but in practice....it was extremely painful. I burned my fingers so many times!! I had planned on making the twine go all the way to the bottom, but after the blisters left on 2 fingers occurred, I decided to just glitter the bottom. There will only be one of these ornaments hanging on my tree:o) 
I gotta hurry up and get that tree b/c the ornaments are starting to pile up in the office:o) The hubs isn't really thrilled about the prospect of owning 4 trees....oh well:o)

Tuesday, November 9, 2010

Christmas Ornament Week-Day 1

It has begun.....I have started decorating for Christmas. Crazy...I know. But I have my reasons. The main one being that I need to help my mother put hers up and she has only slightly less than I do:o) I have 3 trees, and I am about to get one more. I set up S.R.'s tree yesterday and it is so cute. I will share pics of it soon. She LURVES it;o) I put E's tree up as well, but his is lacking a key element....ornaments! Once I get the new tree, it will need ornaments as well. Ornaments can get expensive, so this year I am making them. 
Today's ornament is super easy, super fast, and most importantly, SUPER CHEAP. These frames came from the Dollar Tree.
I flipped them over and popped the backs off of them.
I went to the The Graphics Fairy, and searched the Christmas tab and found the pictures I wanted to print off. I copied and pasted into word and resized the pictures to fit the frames. Afterwards, I glued some twine on the back to hang the ornament.
Easy Peasy and cute to boot;o) I love these ornaments. I think they look a little fancy, but they are so inexpensive to make!
The rest of the week I will be sharing more ornaments that I have made, so stay tuned....I may share a tree or two by the end of the week;o)
Happy Tuesday to all!