Friday, October 29, 2010

Going Google across the 50 States: Texas brothers convert 30% more leads by staying on track with Google Apps

[Cross-posted from the Google Enterprise Blog]

Editor's note: Over 3 million businesses have adopted Google Apps. Today we’ll hear from David Bullock, CFO of YETI Coolers based in Austin, Texas. To learn more about other organizations that have gone Google and share your story, visit our community map or test drive life in the cloud with the Go Google cloud calculator.


YETI Coolers, co-founded in 2005 by brothers Roy and Ryan Seiders, offers durable, super-insulated ice chests for serious outdoor enthusiasts. Roy first recognized the potential of a premium cooler during an early entrepreneurial endeavor and decided to design his own. He recruited his brother to help and the two settled on YETI for the company name – a new brand that consumers could easily associate with frigid toughness. Today, YETI coolers are “certified grizzly-proof” and distributed through over 500 dealers across the country.


When Roy and Ryan started the company, they recognized the value of Google’s free email service, Gmail, and started with one email address – yeticoolers@gmail.com. However, fast forward three years and the company had grown to 10 employees. We hit a tipping point where we needed to expand and create a more professional look with @yeticoolers.com email addresses. The question was how to retain three years of information and still offer the entire office the same easy-to-use interface and access to remotely-stored email history. The solution was Google Apps.

Soon after implementing Google Apps, we hired our first National Sales Director who resides in North Carolina. Despite the geographical barrier, Google Docs has allowed us to collaborate with him and other remote employees in real time, and has became a critical component of our sales process.

Our goal is to increase the number of dealers that sell YETI coolers but for a long time, our volume of dealer inquiries was unmanageable and we missed out on sales opportunities. This is where a Google spreadsheet saved us. We created a “Potential Dealer Tracker” to track, prioritize, and, most importantly follow up with potential YETI dealers. By capitalizing on dealer inquiries in an organized, methodical way, we’ve been able to convert 30% more leads just this year. The profit from the new accounts nearly pays our National Sales Director’s salary!

We also use Google Calendar to track internal and external meetings and even non-work events like Red Raider and Longhorn football games. More recently, we started using Google Sites and launched our company’s first intranet. We look forward to adding even richer content to the site as the company continues to expand.

Given the rapid growth we’ve experienced over the last few years, it has been extremely difficult to stay on top of all areas of the business. Google Apps has changed this, providing the tools we need to succeed. It’s low cost, secure and easy to use – from our standpoint, Google Apps is the perfect solution for any small business.

Google Media Solutions Series, Part 4: Google TV Ads - Tune into success

The Google Media Solutions series has been cross-posted from the Google Agency blog, as the solutions outlined there are fully applicable to small businesses.

Congratulations, you have made it to the final installment of the Google Media Solutions series! We get frequent questions about Google TV Ads; whether it's the right platform, how much it costs, how it works. Here’s your crash course.

Google TV Ads is an online marketing place that allows anyone to launch national TV campaigns and measure their success with timely reporting. Google TV Ads allows you to buy the programs that you want without bundling, pay only for impressions delivered and access viewership data from a sample of millions.

Ready to jump in? Let’s dispel a few myths that you may have heard:
  • Does TV advertising fit into my marketing mix? Television advertising allows you to reach a wider audience than any other advertising medium. Generate brand awareness and demand through sight, sound and motion. It’s also a great supplement to any online strategy - read how ooVoo used TV to drive a 500% increase in site traffic.
  • We want to get started, but we don’t have a commercial. Can you help? Of course! You can use the Google Ad Creation Marketplace to connect with professional ad production houses for as little as $200. Creating compelling, effective TV ads at relatively low costs has never been easier.
  • But is TV Measurable? If you have a website, we recommend tracking and comparing website visits with your TV campaign metrics using Google Analytics. Google Analytics can track TV campaign metrics like TV impressions alongside daily web traffic volume.What does it take to get started? Create a video ad, log into AdWords, choose targets and shows and see your ad on TV within 48 hours! Visit the Getting Started Guide for more tips.
This post concludes our Google Media Solutions series. Over the past four weeks, we have reviewed Google AdWords, the Google Display Network, Remarketing, YouTube and Google TV Ads. Hopefully you have learned some tips and tricks along the way.

Posted by Laura Salzberg, Agency Team

Music Sheet Wreath

I thought that I was done for the week, and then I got a little inspiration. I am not sure if you have visited Miss Mustard Seed, but if you haven't, you need to make your way on over. She creates some of the most beautiful pieces. So while looking at her blog yesterday, I ran across her Christmas tree.
She does a lot with sheet music, and everything she makes with it is BEAUTIMOUS.
I decided it was high time that I try to make something with sheet music. This is what I made yesterday during naptime.
I don't have sheet music, but I do have some old hymnals that haven't been used in years. I found one that was in pretty bad shape, and ripped it to bits. I knew that I would want to keep this wreath up year round, so I had a light bulb go off....
The center of the wreath is removable. I cut out a chipboard circle, and decorated it with the Halloween scrapbook paper I bought the other day. I even got to use my Cricut:o)
On the backside of the circle, I put a little velcro.
This is what the wreath looks like without the centerpiece. 
I guess I gotta head out to Hobby Lobby and get some more scrapbook paper so I can get to work on Thanksgiving and Christmas centerpieces.
Next, I am going to start making some ornaments with the left overs from the hymnal.
Check the side bar on the right to see the parties that I am participating in.


Thursday, October 28, 2010

YouTube’s Promoted Videos picks up steam

How do you increase sales and build your brand when you’re on a limited budget? You might consider using YouTube’s Promoted Videos. YouTube reports that it has served its 500,000,000th Promoted Video view this week and has seen a six-fold increase in clicks it has delivered to businesses such as Shopper’s Choice, Dynomighty and Orabrush. This ad product combines the branding capabilities of video with the direct response action of search advertising, allowing advertisers to promote their videos against search results or related videos on YouTube. For more information on this announcement, please visit the YouTube blog for the full story.

Posted by the YouTube Team

Jack-o-lanterns

These are the pumpkins we carved last weekend. We didn't go to a pumpkin patch and pick these out...we went the easy road and stopped by Fresh Market and grabbed their 3 for $10 deal....we're cheap, what can I say? We thought that the kids would enjoy getting to carve pumpkins, but as soon as the hubs pulled the top off the first pumpkin, and we heard a unanimous "EWWW", we knew that we would be doing this ALONE. Which was fine b/c we got to carve some really cool pumpkins, if I do say so myself:o)

We were trying to carve pumpkins of the characters that the kids would be dressing as for Halloween, but we couldn't find a template for Jessie, so these were the templates we chose. I carved the Buzz pumpkin... with a dull knife. 
He turned out pretty good for not having good tools. Hubs, the engineer, headed to the garage, grabbed his safety glasses and his Drimmel tool, and began to work. He finished the other two pumpkins before I got mine done. Ya'll, that's the way to go when carving pumpkins:o)
Didn't he do a FAB job? I think so:o)
Yesterday we spent the day at home b/c E had a tummy bug. He seems to be fine now, and hasn't had any "episodes" since before lunch. Hoping it was one of those mysterious 12 hour bugs...We did our best to keep S.R. away from him...we really don't want any sickness on Halloween. The kids are really pumped about it this year:o) 
I hope that you all have a safe and Happy Halloween!!
See you back here on Monday!

Tuesday, October 26, 2010

Google Media Solutions Series, Part 3: Re-engage your customers while they browse with remarketing and the Google Display Network

Welcome to the third installment of the Google Media Solutions series. This series has been cross-posted with the Google Agency blog, since many of them are applicable to the small business owner. In this post, we will review the Google Display Network. The Google Display Network is a large group of websites and blogs that display AdWords ads and allows advertisers to scalably reach their customers at moments of relevance. People are using it for direct response, web engagement as well as driving offline conversions.

We have rolled out many new features for the Google Display Network. One that we would like to highlight is remarketing. Google remarketing uses custom technology to reach potential customers who have previously visited your website. Implementing the remarketing tag is very easy; you simply add a pixel to your website. After adding the pixel, you can use remarketing to help capture additional sales or leads by re-targeting users who have already visited the site, and generally convert better and at a lower CPA. To learn more about remarketing and other innovative targeting options on the Google Display Network, you can check out this post from the Google Display Network blog series.

We frequently hear some common misconceptions from advertisers about the GDN that we’d like to clarify:
  • I’ve tried the GDN before - what has changed?: The Google Display Network has changed a lot in the past few years. Today, the median advertiser gets approximately 20% of their conversions from the GDN at a CPA that is comparable to search.* To drive results like these, we are investing heavily in many new features that make the GDN an effective platform for advertisers with any marketing objective. Examples of features we've introduced over the years include site exclusionsabove the fold targetingfrequency capping, and consolidated view-through conversion reporting.
  • The Google Display Network only works for branding: Contextual targeting and remarketing are just a few examples of great tools that direct response marketers can use to reach potential customers in the later stages of the buying cycle, like consideration and decision. The Conversion Optimizer can also help you generate additional conversions at an attractive cost-per-acquisition (CPA). With powerful tools like these, you can make sure you are capturing all your potential customers as they spend time across the web.
Thanks for reading the third part of the Google Media Solutions blog series. Next, we will discuss how you can use Google TV to drive results for your clients. 


*Internal analysis of North America advertisers advertising on both search and content, with conversion tracking enabled, from Dec. 2007 – Nov. 2008

Jessie Hat Tutorial


Today I am sharing a quick tutorial on how to make a Jessie hat. I am going to go ahead and apologize for not taking better pictures. I got so excited during the process that I forgot to take pictures along the way.
Anyway, the supplies you will need.
Cowboy Hat(I already had one left over from E's b-day party, but they have some at Hobby Lobby)
Red Spray Paint(if the hat isn't red already)
Red Yarn
Needle and Thread
Yellow Hair bow, or yellow ribbon
1" White Grosgrain Ribbon
And the really thin ribbon...not sure the size on it. 
Hot Glue Gun

I started out by spray painting the hat. I don't have step-by-step pictures. I just laid the hat on some newspaper, and sprayed a few coats on. Top and inside the brim. I didn't worry with the inside of the hat b/c no one will see that part.

Unwind the yarn and decide on a length for the ponytail. Remember to leave a little extra on the length because you will be braiding the ponytail. You will also need to decide on the thickness you want it to be.
Once you have figured out the length and thickness, tie the top off with a small piece of yarn.
Trim the bottom, so that there aren't any loops. Find something to lay on the yarn, and section the yarn into thirds. Start braiding.
When you are done, take another small piece of yarn and tie the bottom off.
The next step didn't get a picture either...sorry:o/
You will sew the braid to the inside back of the hat. You will want to use coordinating thread if possible. Just make sure that it is in there securely. After you have the braid sewn in, take the grosgrain ribbon and wrap it around the crown. Use your hot glue gun to secure the ribbon.
After that is all complete, it's time to sew in the thin ribbon. 
When sewing this in, make sure to leave it "loopy."  Such a funny word;o) When you have made it all the way around the hat, slide the needle thru a little piece of the brim on the underside so that you can tie it off. The picture shows you what I am talking about.
Tie a small little knot and trim.
Add a yellow hair bow at the bottom of the braid, and enjoy your little one in all of her cuteness:o)
See that pumpkin? I'll share the other pumpkins we carved tomorrow...They are awesome!

Monday, October 25, 2010

Advertise your local business with Google Boost

[Cross-posted from the LatLong Blog]

As a local business owner in today’s day and age, you know that it’s important to have an online presence because that’s where your customers are. In fact, research shows that 97% of people conduct research online before buying locally. Hopefully you’ve gone to Google Places to claim your free business listing that appears on Google and Google Maps. That enables you to share accurate information about your business such as your hours of operation, photos and videos - and now you can do even more.

Today, we’re announcing the availability of a new online advertising solution to help local businesses connect with potential customers in their area. Boost enables business owners to easily create online search ads from directly within their Google Places account. No ongoing management is needed after the initial set up, and this beta is currently available to select local businesses in San Francisco, Houston and Chicago.

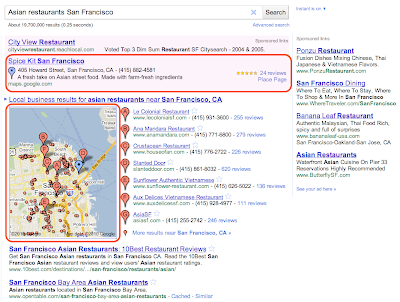
Boost ads are eligible to appear in the “Sponsored Links” section of Google.com and Google Maps search result pages. For example, if you’re a restaurant owner in San Francisco who has signed up for Boost, your ad may show up when someone does a related search like the one below, indicating a cuisine and location that matches yours. Beyond the basics like your company name, address, phone number and website, your ad may also include the number of reviews you’ve received, an average star rating and a link to your Place page to help potential customers find additional useful information about your business. When a map appears alongside the results, a blue pin will help folks quickly find your location on the map. Businesses using Google Tags will also see their yellow tag appear in the ad.


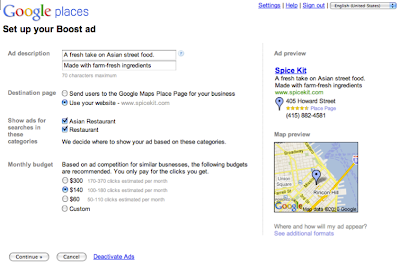
To create your ad, all that is required is a short business description, a web or Place page, your business categories and a monthly budget. From there, our system automatically sets up your ad campaign - figuring out the relevant keywords that will trigger your ad to appear on Google and Google Maps, and how to get the most out of the budget you allotted. You’ll only pay when a potential customer actually clicks on your ad, and you can also view basic ad performance data from your Google Places dashboard.

Here is an example of the simple sign up page within Google Places, which takes just a few minutes to complete. To make the process even easier, the “description” and “categories” fields may be pre-populated with suggestions based on the information you provided on the Place page for your business.


We hope Boost provides busy local business owners with a quick and easy way to share information about themselves with the people who look for them online. Placement in the “Sponsored Links” section of the page will, as always, depend on factors such as your ad’s relevance and quality. Boost does not affect the ranking of the free, organic business listings in any way.

As we do with all beta features, we’ll carefully review the data and effectiveness of this trial and may make changes before making decisions about any future expansion. In the meantime, business owners can sign in or claim their listing in Google Places, and select businesses in San Francisco, Houston and Chicago will see an invitation to try Boost in the account dashboard. Interested businesses outside these areas can sign up to receive notification when Boost comes to their area by filling out this form.

Posted by Kiley McEvoy, Product Manager

Friday, October 22, 2010

Going Google across the 50 States: Investment advisory firm in Illinois turns to technology to get ahead

[Cross-posted from the Google Enterprise Blog]

Editor's note: Over 3 million businesses have adopted Google Apps. Today we’ll hear from Dustin Bonnema, Portfolio Analyst and IT guru for MainStreet Advisors based in Chicago, Illinois. To learn more about other organizations that have gone Google and share your story, visit our community map or test drive life in the cloud with the Go Google cloud calculator.


Founded in 2003 by two veteran investment professionals, MainStreet Advisors is a Chicago-based Securities and Exchange Commission (SEC) Registered Investment Advisor. We provide investment advisory services, portfolio management, and marketing support for our clients, and are expanding rapidly - we’ve already outgrown our current office space, two years ahead of plan.

Such fast growth prompted us to focus more on technology and find ways to remove communication barriers for all employees. So we switched to Google Apps earlier this year and are already using many of the products in the suite including Gmail, Google Calendar, Google Docs, and Google Sites. We couldn’t be happier with Google Apps, and the best part is that everything is online and all the products are easy to learn and use. We’re trying to put as much as we can into a Google spreadsheet or document.

Shared Google Calendars are used to track time-off, conferences, committee meetings, and individuals’ travel schedules. This is a critical component of our internal communication strategy since Managing Directors and other executives travel as much as 40 - 50% of the year. This same group is reliant on mobile phones, and use either iPhones or BlackBerry devices to access Gmail and other applications, while they’re on the go.

As the company grows, it has become harder to locate and share updated information and policies across all employees. Google Sites is solving this problem – we built an intranet that includes links to shared calendars, client websites, group email aliases, expense reports, gift matching instructions, and investment policies. A Google form is also embedded in the site so employees can submit vacation requests that are updated directly in our HR manager’s spreadsheet. In time, we plan to add even more to the site – we’re already showing gadgets with intra-day performance of market indexes across the world and we’d like to add a map of client locations and charts outlining our company assets over time.

Aside from helping us create more efficient business processes, Google Apps has become a key part of our business continuity plan. We have the security of knowing that if something goes wrong in the Chicago office, we’ll still be able to access our information from other places. This is critical to protecting our clients’ investments, and the future of our business.”

Thursday, October 21, 2010

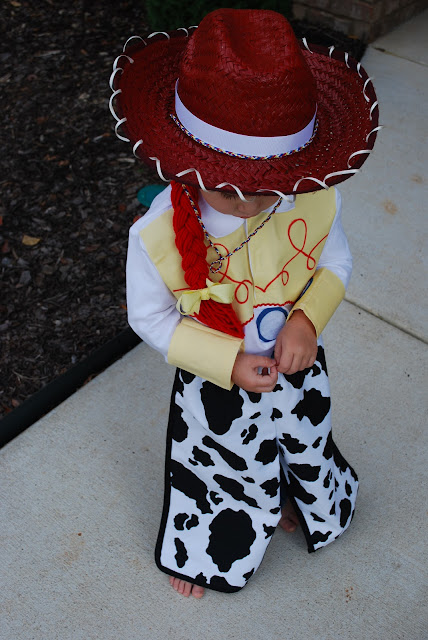
Toy Story's Jessie Costume(edited)


Complete Outfit:
Posting How-to for hat tomorrow. 
Just wanted to share how CA-UTE S.R. looked:o)


Yeee-Haw!
Ya'll, I am so excited with how S.R.'s costume is turning out. For the past 3 months, S.R. has been talking about dressing up as Jessie for Halloween. E is going to be Buzz, and I purchased his costume a month ago b/c I knew that it would be sold out soon. I kept looking for a Jessie costume, and I never saw one. I finally looked on Target's Website and they had one....for $35! I Don't Think So! And it was UGLY.
So for any of you gals out there who has a little Jessie....here's a tutorial on how to make your own for less....WAAAY less.

Materials Needed for the Shirt:
Long Sleeve Polo Shirt(mine came from Target for $4)
Yellow Fabric
Blue and White Felt
Heat Bond(from Walmart)
Red Fabric Marker(or Sharpie)
Red Ric Rac
Sticky Back Velcro

These shirts are in the boys' section at Target. I got a 4T. It is slightly long in the arms, which is perfect.

To start out, you want to remove the buttons. (My apologies for the brightness of the pictures. I was doing this at night, so I had to use the flash.) If your button holes are too large like this one, go ahead and use a zig zag stitch to close it up.
 Next you will want to place the velcro where the buttons and button holes used to be.
If you squint, you can see the velcro;o)
Pretty easy so far, right?:o) Now you will want to grab your yellow fabric and heat bond. We will be making the yellow cuffs of the sleeves. 
Measure the width of the bottom of the sleeve, just above the cuff on the shirt. Add a 1/2" to that measurement. Decide how long you want your cuff to be. I made mine about 4". 
Cut your Heat Bond the dimensions that you measured out and lay on your yellow fabric. You will want to leave enough room to fold the fabric over once you have adhered the heat bond.
Follow the instructions for the Heat Bond. 
Once the fabric has cooled, cut around the edges where the fabric was adhered.
Now you will want to cut off the cuff on shirt. It will make it easier to sew the yellow cuff on.
Back to the yellow cuff. With Right sides facing, sew a 1/4" seam allowance on the edge.
Here comes the tricky part. And I hope I get this right:o) Take the RIGHT side of the cuff and the WRONG side of the sleeve and match raw edges. Sew a 1/4" seam. 
Flip the cuff out and fold it back on the sleeve. Press, and stitch in place.

Next are the buttons. You can use blue or grey felt for this, but all I had was blue. You will need to cut out 3 different sized circles. I cut a 2", 1.5" & a slightly more than 1" circle. If you have a circle cutter, it makes this task really simple. 
Use these circles as your patterns. The Largest and Medium circle will be the buttons for the front of the shirt. Cut 2 Blue Large Circles. Cut 2 Medium White Circles.
Cut the same amount for each from the Heat Bond. Apply the bottom circles first and then the top. Since felt is a little thicker, you will need to hold the iron down a few seconds longer for the heat to penetrate.


For the cuffs of the sleeves, you will use the Medium and Smallest Circles for your patterns. Same steps as above, just make sure to apply on the BACKS of the sleeves.
Go back to your yellow fabric. You are going to lay the fabric on top of the shirt and trace around the neck and sleeves. Use a fabric pencil if you have one. Make sure to make the points down at the bottom of the breast.
Cut along the lines that you traced and you should have something that looks like this.
Once you have it the way you want it, cut out more Heat Bond and apply it to the back of the fabric. Lay it back on top of the shirt exactly where you will be ironing it in place, and grab your scissors again. You need to cut a slit where the shirt opens up. Now iron in place.
Use the square side of your ironing board to make things easier.
We're almost there....
Grab your pencil again. This is the part that may scare some of you....Free Hand time;o) I used a picture I found online of Jessie and just free handed the squiggly red lines on the yellow. Use a pencil first and then go back over it with your red marker.
The pencil lines show up a little better on this picture.
Once you have the lines where you want them, trace over them with the red marker and it should look a little something like this.
Next, sew your ric rac along the bottom edge of the yellow.
And that's it for the shirt. 
In all I think the shirt cost about $6-$8. Thankfully I already had some of this stuff.
Now for the Cow Print Chaps.
Jessie's are attached just below the hip bone, but I made these to go all the way up to the waist.

Materials needed for the Chaps:
Cow Print Fabric(1/2 yd for 4T. Can get this at Walmart)
Black Double Wide Bias Tape
Elastic
Pattern for Pants(Front side only)

Cut out 2 FRONT pant legs from any pants pattern
Stitch seam along crotch. Press seam. Sew bias tape all the way around edges, except for the waist line. Just outside edges.

Next you need to fold down the waist to make a the hole for the elastic. I folded down 2". Turn under the raw edges and press. Stitch the seam.
For the belt, I used the left over Bias Tape and a 10" piece of elastic. I sewed the bias tape on either end of the elastic. Run the belt thru the opening at the waist. Stitch ends to secure.
These cost around $3.50 to make.
So for less that $12, I made this super cute costume..
 Easy as pie and now you can have some pie since you saved all that money by making your own:o)
If you have any questions on this tutorial, please feel free to email me. I am not always clear on my instructions;o)

On Monday, I will share with you all the hat that goes with this costume....Ya'll have a great weekend, ya hear!